More of the same and sudden panic

I’ve been a little quiet recently and that has been because of a few reasons, some personal and a sudden lack of motivation after a number of things had gone wrong including the UV unwrapping stage of creating a mesh.

From my previous post I have decided simplify my project further by creating some room objects that are more modular, by this I mean making a series of three or more meshes that can be interchangable instead of one mesh that is repeated over and over, though this works with games more film seems a little less forgiving as we tend to look at the environment whilst watching an actor’s performance.

With this all in mind I have decided to create to make a small list of what I hope to have finished by the end of the week:

  • 3 cupboards (Varying doors/details) based on a modular aesthetic
  • Power cylinder/engine
  • Power box
  • Energy cell
  • Pipes
  • Greeble/Nurnie assets (if possible)

Each mesh should have a colour id map, ready to be brought into Substance Painter. From here each model should be painted with a uniform look and application of theme.

After this I need to make sure the model functions as needed and upload to Gumroad as the main distribution method.

After all of this I should have the bulk of the work tied down ready for the hand-in in 12.

Getting the theme nailed down.

In the most recent tutorial with Jon he suggested that I look at my theme in much more detail. As it stands I am looking at steampunk, but as much as I like this genre there is something much more appealing to the Dieselpunk counterpart, the main thing that I can think of imediately is that Steampunk is a pretty well received genre and as such there are a number of expectations attached that I could possibly overlook, however Dieselpunk is more function over aesthetics, I can still take elements from both themes as they are often regarded as cousins. With this in mind I have decided to shift my theme closer to Dieselpunk as it has slightly less expectations attached but also has internal combustion rather than steam power meaning I could create engines and power supplies that are fuel and electrical based rather than having to think of ways to (I guess) retrofit and reverse engineer objects that don’t physically exist.

I’m still looking at games such as Bioshock and Wolfenstein for inspiration however Jon has mentioned a series on Netflix called The man in high castle, which may be worth looking into as well as a documentary on Steampunk. Though my theme has changed a little I feel as there is a reason for machinery and objects it gives more sense to the final theme.


Steampunk looks to be more ornate in nature, sure there are pipes and various functional elements but at the same time there are a number of decorations and materials that would be quite expensive such as coloured wood, and various metals such as copper, etc. Although this is aesetically pleasing to look at it feels like something that is shown to make people jealous in a way, it looks nice and to a degree is functional but it’s the sort of thing theme I’d imagine wealthy characters would show off. More so if there is clockwork machinery and steam-powered technology visibly working in an environment.

However Dieselpunk looks more function ready, I may not be an engineer but it’s obvious to some objects that a panel is in a specific place because it’s dictated by the function of the machine. With this in mind the materials that look to be most common are in fact metals, perhaps iron, steel and aluminium, there are also colours. As metal can be weathered to create a narrative there is a way to make use layers in substance painter to show this same process. As dieselpunk relies on internal combustion there will be a series of engines and objects that serve a purpose, with this in mind I am limiting my work down to a number of models that fall under a Wolfenstein inspired theme; with this theme in mind I am thinking of including a mix of engines a few variations combustion (If possible) and some more sci-fi inspired such as energy cells.

From breif read through common complaints in some forums about the pricing of 3D assets, a common request was for modular assets. Although this seems more tailored to games it may also prove to be useful when creating the assets for my final models.

UV unwrapping and playing with Substance painter

Back again, I should really make a post on inspiration and so on but for the moment I have a new model to feast you eyes on. It’s not the most complex model, actually it’s probably the simplest one I have done. The idea behind this was to make something inside of an hour, then after that hour think about how to export the model into Substance painter as I aim to use this for my project. As this is over the half way point I’m starting to panic a little but I have actually made something that might be usable.

Okay, so after a tutorial with Jon (I want to say last tuesday, but all my days are blurring together) we talked about how objects that have been manufactured by a machine or otherwise wouldn’t have sharp edges as the would be rounded off enough to be usable, unless it’s function was to cut (But even then part of the object would be rounded). Naturally I tried to find an object that I own that has a sharp edge but it turns out that the edges on most object appear to be rounded off so they are blunt and easy to move, build etc.

With that in mind we looked into ways that we can achieve a similar effect in Blender. After the mesh was built it’s best to make sure that is the shape you want and then apply smoothing by clicking the ‘smooth’ button on the left toolbar (by default) this will create a horrible looking mesh but then we can go to the toolbar on the right and find the tab that allows object modification (I can’t remember which tab it is without looking at Blender…) from there we can change the angle that is smoothed out Jon suggested changing it to around 60 degrees this means that anything over a 60 degree angle is smoothed down.

Next…

We go back into edit mode and select the edge tab, from there after our edge is selected we press Alt+L Click (Or R Click, if default) and then press Ctrl+B to bevel the edge, then we can scale the edge and use the mouse wheel to increase the amount of new angles.

And that is pretty much it, just rinse and repeat…

By the end of the modelling hour I had something like the gif above, I was pretty happy with it considering I didn’t plan it out.


Next I tried at assigning materials to the object to make a colour map, it didn’t quite work but I was still able to take into substance painter a little later.

Okay now the tricky-ish part.

UV unwrapping… I need to research this more but when creating a mesh in Blender it’s already wrapped in the 3D view but when going to texture it needs to be unwrapped so it’s flat, or the net of the shape. We do this by going into edit mode creating seams on the object first, thinking about how the shape fits together, in this case it’s a cylinder so we need to create a seam at the back and along the length followed by a seam at the top and bottom where the caps are. Next we need to apply scale and rotation to the mesh to reduce stretching when it comes to the next step. Now after we select the whole object with A we can click UV unwrap located on the left toolbar, this should then create the unwrapped mesh in a separate view, from this we add a new material and find the uv grid in the material properties. In theory if I remembered the steps in the correct order the mesh should have a grid map as the active texture and the squares should be… well square, if not there is some stretching and we may need to refine the mesh a little.

Once this is done and everything is done we are ready to start exporting. To explain it better Jon made a tutorial on how to export meshes from Blender.

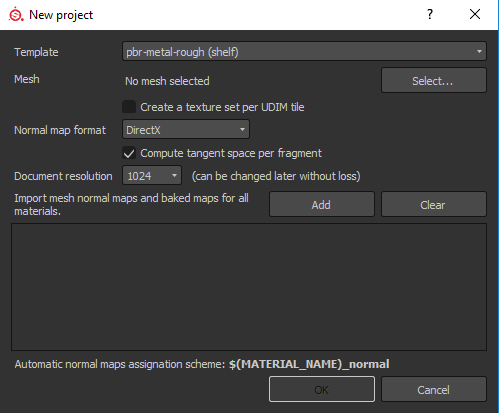
Now for the texturing part. Once in Substance painter open a new project and import the mesh but using these project settings.

Once the mesh is selected, click ‘Bake Textures’ should be on a toolbar on the right of the viewport.

Here’s where I suspect things went wrong for me, I hadn’t created any maps for my object however I had created separate materials with the intention of creating a colour map (It didn’t quite work but I still had the materials to separate the mesh into layers) from this I was able to apply masks to the material layers in order to apply a texture. For this as a ‘proof of concept’ I used a number of smart materials and smart masks with a few other things and when it came to rendering the image file it came out with something like this.


Research Greeble and Nurnies

I should have posted this earlier but I just go so focused on making something  that I had gotten distracted away from posting research topics. So something  that I have found whilst working with Blender is that the edges are flat, or rather the faces are; of there are a number of ways to solve this if it is an issue such as creating materials and textures, specifically hieght, bump and normal maps but that is part of the texturing pipeline and before we can do that we need to have an unwrapped model to work with.

This is where Greebles and Nurnies come in, now the best example I can think of is the various vehicles that were modelled for the Star Wars films. First of all what actually are they? Well they are both the same thing, different ppeople use different names but they are the little details that are added to a model to make it more visually appealing. They are sometimes referrerd to as “guts on the outside” and “Things that look cool, but don’t do anything”.

These little details came from a process from model making called ‘kit-bashing’ where creators takes parts from a range of models and make them work together in order to create something new like a starship or a sci-fi interior; however now we have access to 3D modelling software the process is similar but the methods are different, when modelling in Blender for example we have to model every little detail but that doesn’t mean that the details are restricted to one model for example there could be a number of pipes and panels that make up part of a scene. With those assets in place we can copy, rotate and re-position parts of the already created asset to make something similar but ordered differently in making something new in the process.


It’s ALIVE! (Or soon will be)

This lovely little update is so show off the latest model I made today, it’s more complicated than the previous model with a total of 42 objects, 27,044 Vertices, 26,034 Faces and 53,916 Tris but I have enjoyed this build. This was originally a much larger object but I looked into greebles (think I spelt that correctly) basically the little details that can be repeated on models that often comes from a process called ‘kit-bashing’ best example is the numerous vehicles created for the original Star Wars movies. The idea is that each greeble can be repeated repeated and tiled but maybe at a different angle to create additional detail, there will be a research post about this soon.

So what is this model?

Well since I am going with a steampunk/dieselpunk theme I looked at a range of pintrest images and some assets in two games I have played recently, as a research point I spent time looking at various consoles and backgrounds in Dishonored and Bioshock: Infinite. (Once I get access to my PSN capture gallery I’ll upload the images I took inspiration from) The idea to this model is that it is in a lab or engineering room and is a control desk for distributing power. As this is steampunk in theme I figured that function over aesthetics would be the driving idea behind the shape but the materials would explain where in the world it’d fit. For example somewhere such as a lab owned by someone upper class may favour brass, copper, minimal steel and have an expensive varnished wood; where as an engineering room that is tucked away might favor steels, and other colder materials and colours as it is more function than decoration.

How it’s made is pretty simple compared to what I thought originally. All of the objects on this model with the exception of two have a duplicate I found this would save time with the modelling process but makes variation a slight issue. The other problem that I think I might encounter is when I get to creating the ID map as almost all of the 26,034 shape faces are visible at one angle or another, so some revision may need to be made but unlike some projects I am happy to sit for hours making models like this. The downside to that is that I feel like I’m neglecting the theory and research parts of this project.